Building Custom Extensions with goose
goose allows you to extend its functionality by creating your own custom extensions, which are built as MCP servers. These extensions are compatible with goose because it adheres to the Model Context Protocol (MCP). MCP is an open protocol that standardizes how applications provide context to LLMs. It enables a consistent way to connect LLMs to various data sources and tools, making it ideal for extending functionality in a structured and interoperable way.
In this guide, we build an MCP server using the Python SDK for MCP. We’ll demonstrate how to create an MCP server that reads Wikipedia articles and converts them to Markdown, integrate it as an extension in goose. You can follow a similar process to develop your own custom extensions for goose.
You can check out other example servers in the MCP servers repository. MCP SDKs are also available for other common languages, such as TypeScript and Kotlin.
goose supports Tools, Resources, and Prompts from the Model Context Protocol. See mcp_client.rs for the supported protocol version and client capabilities.
Prerequisites
Before you begin, ensure you have the following installed on your system:
- Python 3.13 or higher - Required for the MCP server
- uv - Python package manager used in this tutorial
- Node.js and npm - Only required if you want to use the MCP Inspector development tool in Step 4.
Step 1: Initialize Your Project
The first step is to create a new project using uv. We will name our project mcp-wiki.
Run the following commands in your terminal to set up a basic structure for your MCP server:
uv init --lib mcp-wiki
cd mcp-wiki

mkdir -p src/mcp_wiki
touch src/mcp_wiki/server.py
touch src/mcp_wiki/__main__.py
Your project directory structure should look like this:
.
├── README.md
├── pyproject.toml
└── src
    └── mcp_wiki
        ├── __init__.py   # Primary CLI entry point
        ├── __main__.py   # To enable running as a Python module
        ├── py.typed      # Indicates the package supports type hints
        └── server.py     # Your MCP server code (tool, resources, prompts)
Step 2: Write Your MCP Server Code
In this step, we’ll implement the core functionality of the MCP server. Here is a breakdown of the key components:
server.py: This file holds the main MCP server code. In this example, we define a single tool to read Wikipedia articles. You can add your own custom tools, resources, and prompts here.__init__.py: This is the primary CLI entry point for your MCP server.__main__.py: This file allows your MCP server to be executed as a Python module.
Below is the example implementation for the Wikipedia MCP server:
server.py
import requests
from requests.exceptions import RequestException
from bs4 import BeautifulSoup
from html2text import html2text
from urllib.parse import urlparse

from mcp.server.fastmcp import FastMCP
from mcp.shared.exceptions import McpError
from mcp.types import ErrorData, INTERNAL_ERROR, INVALID_PARAMS

mcp = FastMCP("wiki")

@mcp.tool()
def read_wikipedia_article(url: str) -> str:
    """
    Fetch a Wikipedia article at the provided URL, parse its main content,
    convert it to Markdown, and return the resulting text.

    Usage:
        read_wikipedia_article("https://en.wikipedia.org/wiki/Python_(programming_language)")
    """
    try:
        # Validate input
        if not url.startswith("http"):
            raise ValueError("URL must start with http or https.")

        # SSRF protection: only allow Wikipedia domains
        parsed = urlparse(url)
        hostname = parsed.netloc.lower()

        # Allow wikipedia.org or *.wikipedia.org subdomains only
        if hostname != 'wikipedia.org' and not hostname.endswith('.wikipedia.org'):
            raise ValueError(f"Only Wikipedia URLs are allowed. Got: {parsed.netloc}")

        # Add User-Agent header to avoid 403 from Wikipedia
        headers = {
            'User-Agent': 'MCP-Wiki/1.0 (Educational purposes; Python requests)'
        }
        response = requests.get(url, headers=headers, timeout=10)
        if response.status_code != 200:
            raise McpError(
                ErrorData(
                    code=INTERNAL_ERROR,
                    message=f"Failed to retrieve the article. HTTP status code: {response.status_code}"
                )
            )

        soup = BeautifulSoup(response.text, "html.parser")
        content_div = soup.find("div", {"id": "mw-content-text"})
        if not content_div:
            raise McpError(
                ErrorData(
                    code=INVALID_PARAMS,
                    message="Could not find the main content on the provided Wikipedia URL."
                )
            )

        # Convert to Markdown
        markdown_text = html2text(str(content_div))
        return markdown_text

    except ValueError as e:
        raise McpError(ErrorData(code=INVALID_PARAMS, message=str(e))) from e
    except RequestException as e:
        raise McpError(ErrorData(code=INTERNAL_ERROR, message=f"Request error: {str(e)}")) from e
    except Exception as e:
        raise McpError(ErrorData(code=INTERNAL_ERROR, message=f"Unexpected error: {str(e)}")) from e
__init__.py
import argparse
from .server import mcp

def main():
    """MCP Wiki: Read Wikipedia articles and convert them to Markdown."""
    parser = argparse.ArgumentParser(
        description="Gives you the ability to read Wikipedia articles and convert them to Markdown."
    )
    parser.parse_args()
    mcp.run()

if __name__ == "__main__":
    main()
__main__.py
from mcp_wiki import main

main()
Step 3: Define Project Configuration
Configure your project using pyproject.toml. This configuration defines the CLI script so that the mcp-wiki command is available as a binary. Below is an example configuration:
[project]
name = "mcp-wiki"
version = "0.1.0"
description = "MCP Server for Wikipedia"
readme = "README.md"
requires-python = ">=3.13"
dependencies = [
    "beautifulsoup4>=4.14.0",
    "html2text>=2025.4.15",
    "mcp[cli]>=1.25.0",
    "requests>=2.32.3",
]

[project.scripts]
mcp-wiki = "mcp_wiki:main"

[build-system]
requires = ["hatchling"]
build-backend = "hatchling.build"
Step 4: Test Your MCP Server
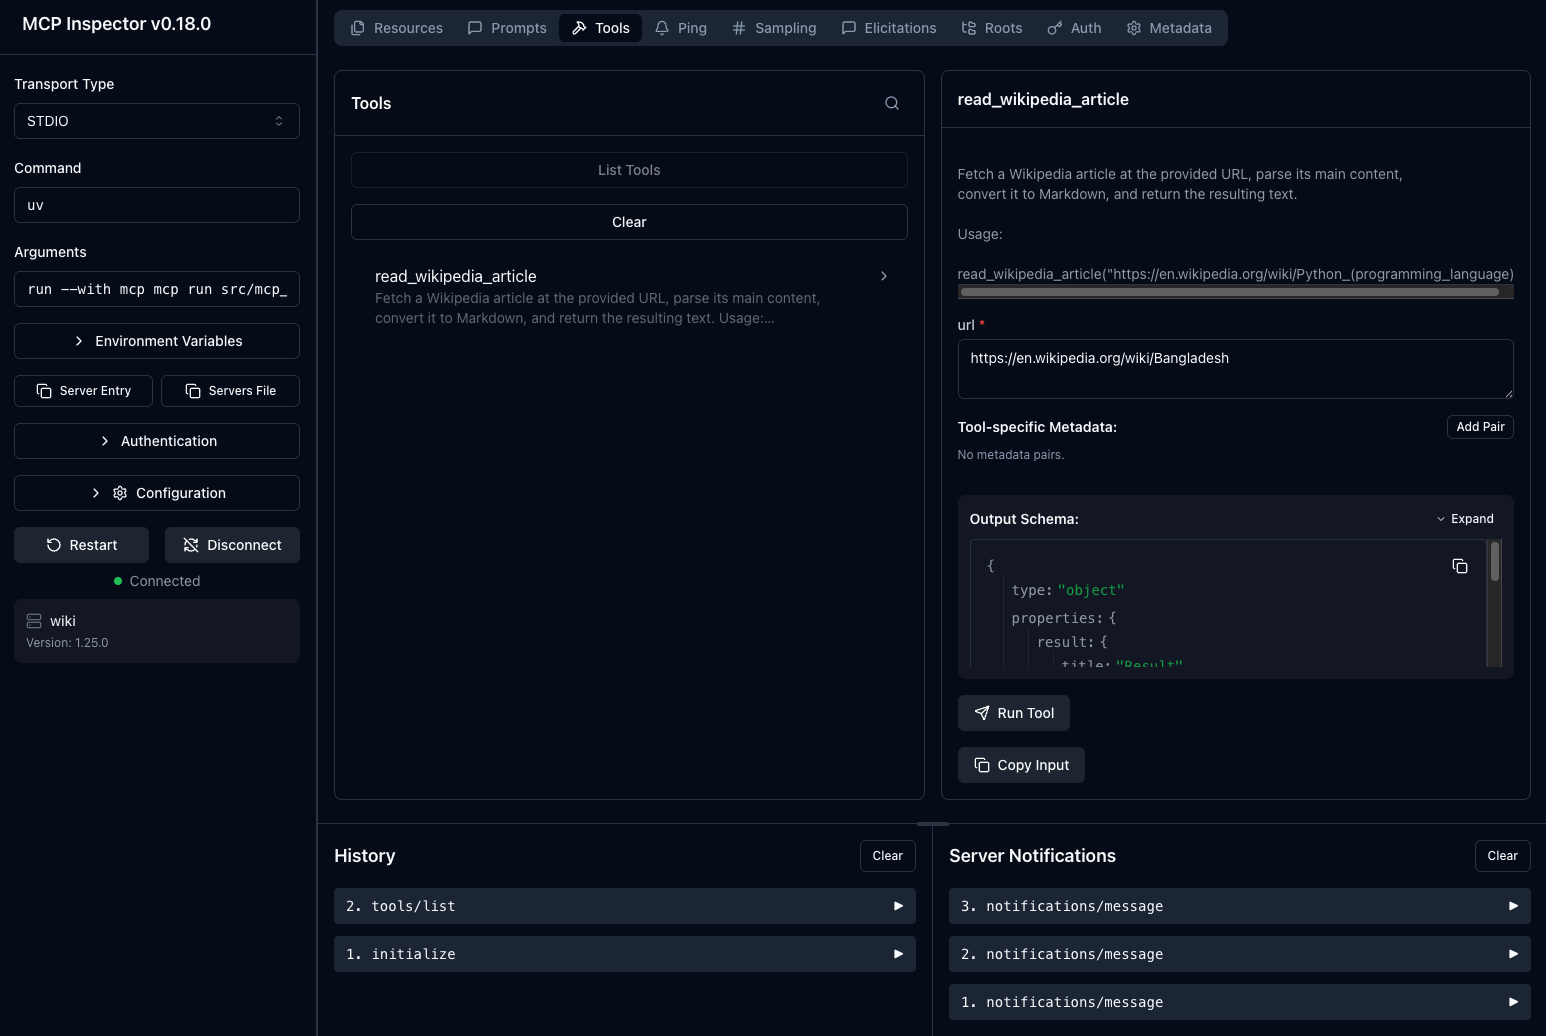
Verify that your MCP server is running in the MCP Inspector (a browser-based development tool) or the server CLI.
- In MCP Inspector
- In the CLI
MCP Inspector requires Node.js and npm installed on your computer.
-
Set up the project environment:
uv sync -
Activate your virtual environment:
source .venv/bin/activate -
Run your server in development mode:
mcp dev src/mcp_wiki/server.pyMCP Inspector should open automatically in your browser. On first run, you'll be prompted to install
@modelcontextprotocol/inspector. -
Test the tool:
- Click
Connectto initialize your MCP server - On the
Toolstab, clickList Toolsand click theread_wikipedia_articletool - Enter
https://en.wikipedia.org/wiki/Bangladeshfor the URL and clickRun Tool
- Click
-
Set up the project environment:
uv sync -
Activate your virtual environment:
source .venv/bin/activate -
Install your project locally:
uv pip install . -
Verify the CLI:
mcp-wiki --helpYou should see output similar to:
❯ mcp-wiki --help
usage: mcp-wiki [-h]

Gives you the ability to read Wikipedia articles and convert them to Markdown.

options:
  -h, --help  show this help message and exit
Step 5: Integrate with goose
To add your MCP server as an extension in goose:
-
Build the extension binary:
uv pip install . -
Open goose Desktop and click the button in the top-left to open the sidebar
-
Click
Extensionsin the sidebar -
Set the
TypetoSTDIO -
Provide a name and description for your extension
-
In the
Commandfield, provide the absolute path to your executable:uv run /full/path/to/mcp-wiki/.venv/bin/mcp-wikiFor example:
uv run /Users/smohammed/Development/mcp/mcp-wiki/.venv/bin/mcp-wiki
To see any changes you make to your MCP server code after integrating with goose, re-run uv pip install . and then restart goose Desktop.
For the purposes of this guide, we'll run the local version. Alternatively, you can publish your package to PyPI. Once published, the server can be run directly using uvx. For example:
uvx mcp-wiki
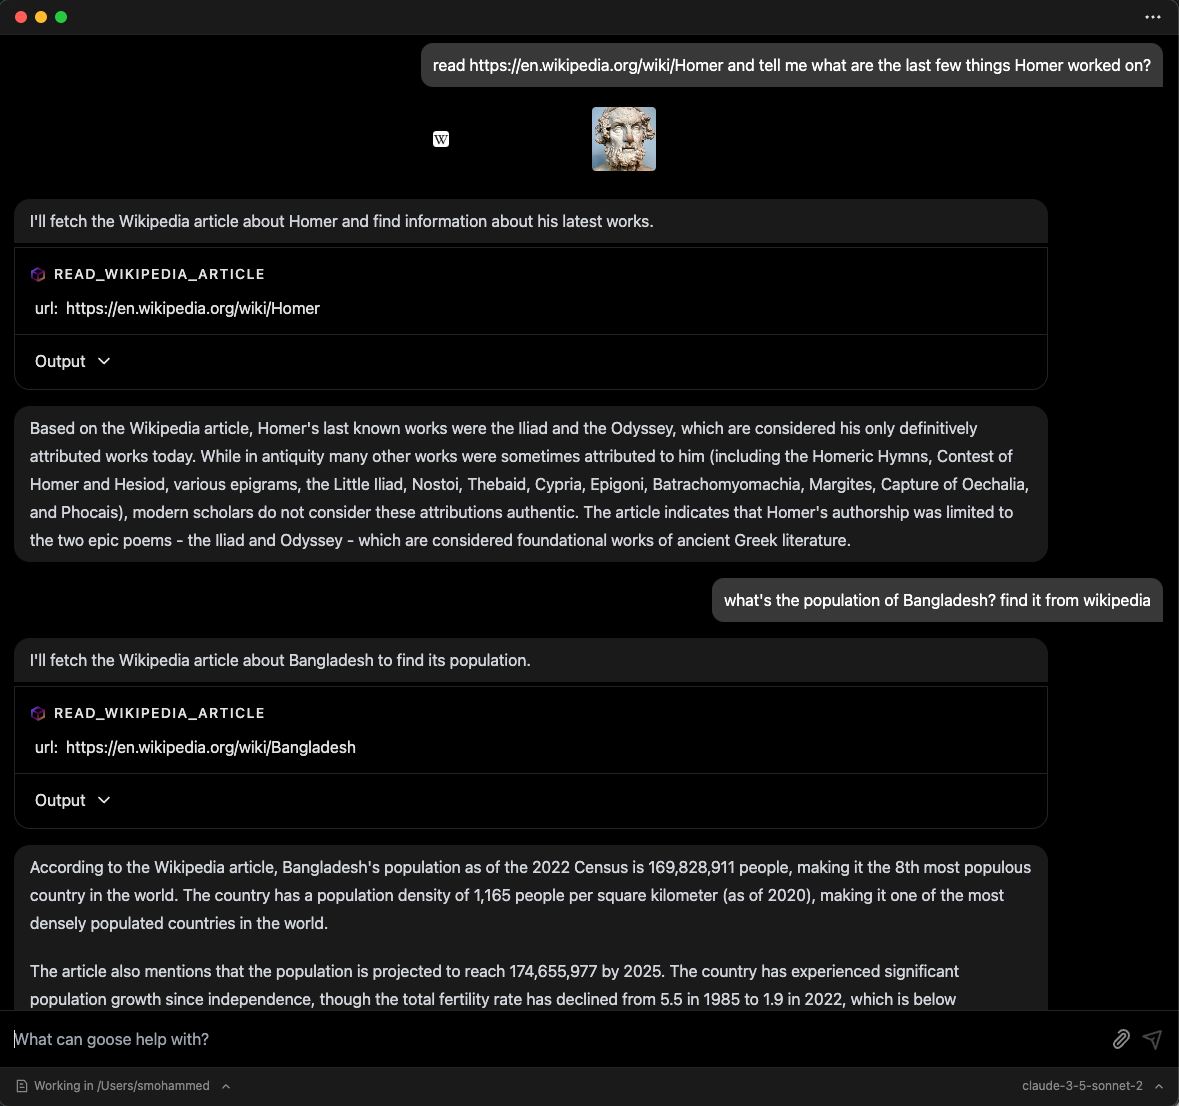
Step 6: Use Your Extension in goose
Once integrated, you can start using your extension in goose. Open the goose chat interface and call your tool as needed.
You can verify that goose has picked up the tools from your custom extension by asking it "what tools do you have?"
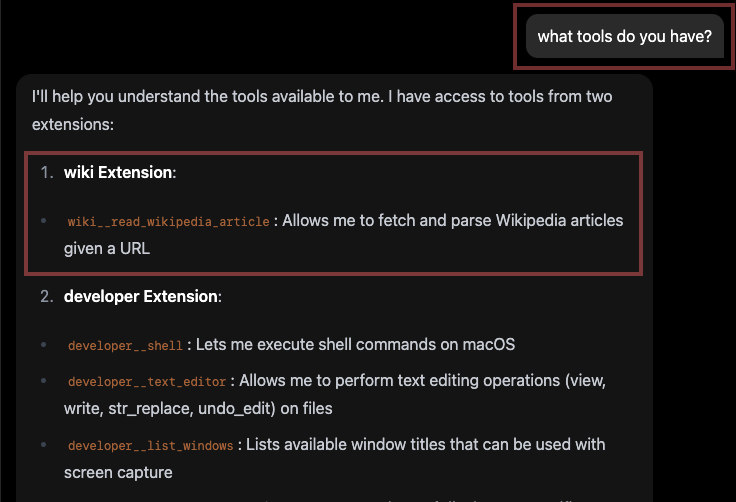
Then, you can try asking questions that require using the extension you added.
🎉 Congratulations! You’ve successfully built and integrated a custom MCP server with goose.
Advanced Features for MCP Extensions
goose supports advanced MCP features that can enhance your extensions.
MCP Sampling: AI-Powered Tools
MCP Sampling allows your MCP servers to request AI completions from goose's LLM, transforming simple tools into intelligent agents.
Key Benefits:
- Your MCP server doesn't need its own OpenAI/Anthropic API key
- Tools can analyze data, provide explanations, and make intelligent decisions
- Enhanced user experience with smarter, more contextual responses
- Secure by design: requests are isolated and attributed automatically
Getting Started:
- Use the
sampling/createMessagemethod in your MCP server to request AI assistance - goose's implementation currently supports text and image content types
- goose automatically advertises sampling capability to all MCP servers
Use Cases: Document summarization, smart search filtering, code analysis, data insights
Learn More: See the MCP Specification for technical details.
MCP Apps: Interactive Extensions
MCP Apps enable rich, interactive user interfaces instead of text-only responses.
Key Benefits:
- Return interactive UI components from your MCP server tools
- Components render securely in isolated sandboxes within goose Desktop
- Real-time user interactions trigger callbacks to your server
Use Cases: Interactive forms, data visualizations, booking interfaces, configuration wizards
Learn More: Building MCP Apps Tutorial
goose also supports MCP-UI, but MCP Apps is the recommended path for new extensions.