5 Tips for Building MCP Apps That Work


MCP Apps allow you to render interactive UI directly inside any agent supporting the Model Context Protocol. Instead of a wall of text, your agent can now provide a functional chart, a checkout form, or a video player. This bridges the gap in agentic workflows: clicking a button is often clearer than describing the action you hope an agent executes.
MCP Apps originated as MCP-UI, an experimental project. After adoption by early clients like goose, the MCP maintainers incorporated it as an official extension. Today, it's supported by clients like goose, MCPJam, Claude, ChatGPT, and Postman.
Even though MCP Apps use web technologies, building one isn't the same as building a traditional web app. Your UI runs inside an agent you don't control, communicates with a model that can't see user interactions, and needs to feel native across multiple hosts.
After implementing MCP App support in our own hosts and building several individual apps to run on them, here are the practical lessons we've picked up along the way.
Overview of how UI renders with MCP Apps
At a high level, clients that support MCP Apps load your UI via iFrames. Your MCP App exposes an MCP server with tools and resources. When the client wants to load your app's UI, it calls the associated MCP tool, loads the resource containing the HTML, then loads your HTML into an iFrame to display in the chat interface.
Here's an example flow of what happens when goose renders a cocktail recipe UI:
- You ask the LLM "Show me a margarita recipe".
- The LLM calls the
get-cocktailtool with the right parameters. This tool has a UI resource link in_meta.ui.resourceUripointing to the resource containing the HTML. - The client then uses the URI to fetch the MCP resource. This resource contains the HTML content of the view.
- The HTML is then loaded into the iFrame directly in the chat interface, rendering the cocktail recipe.
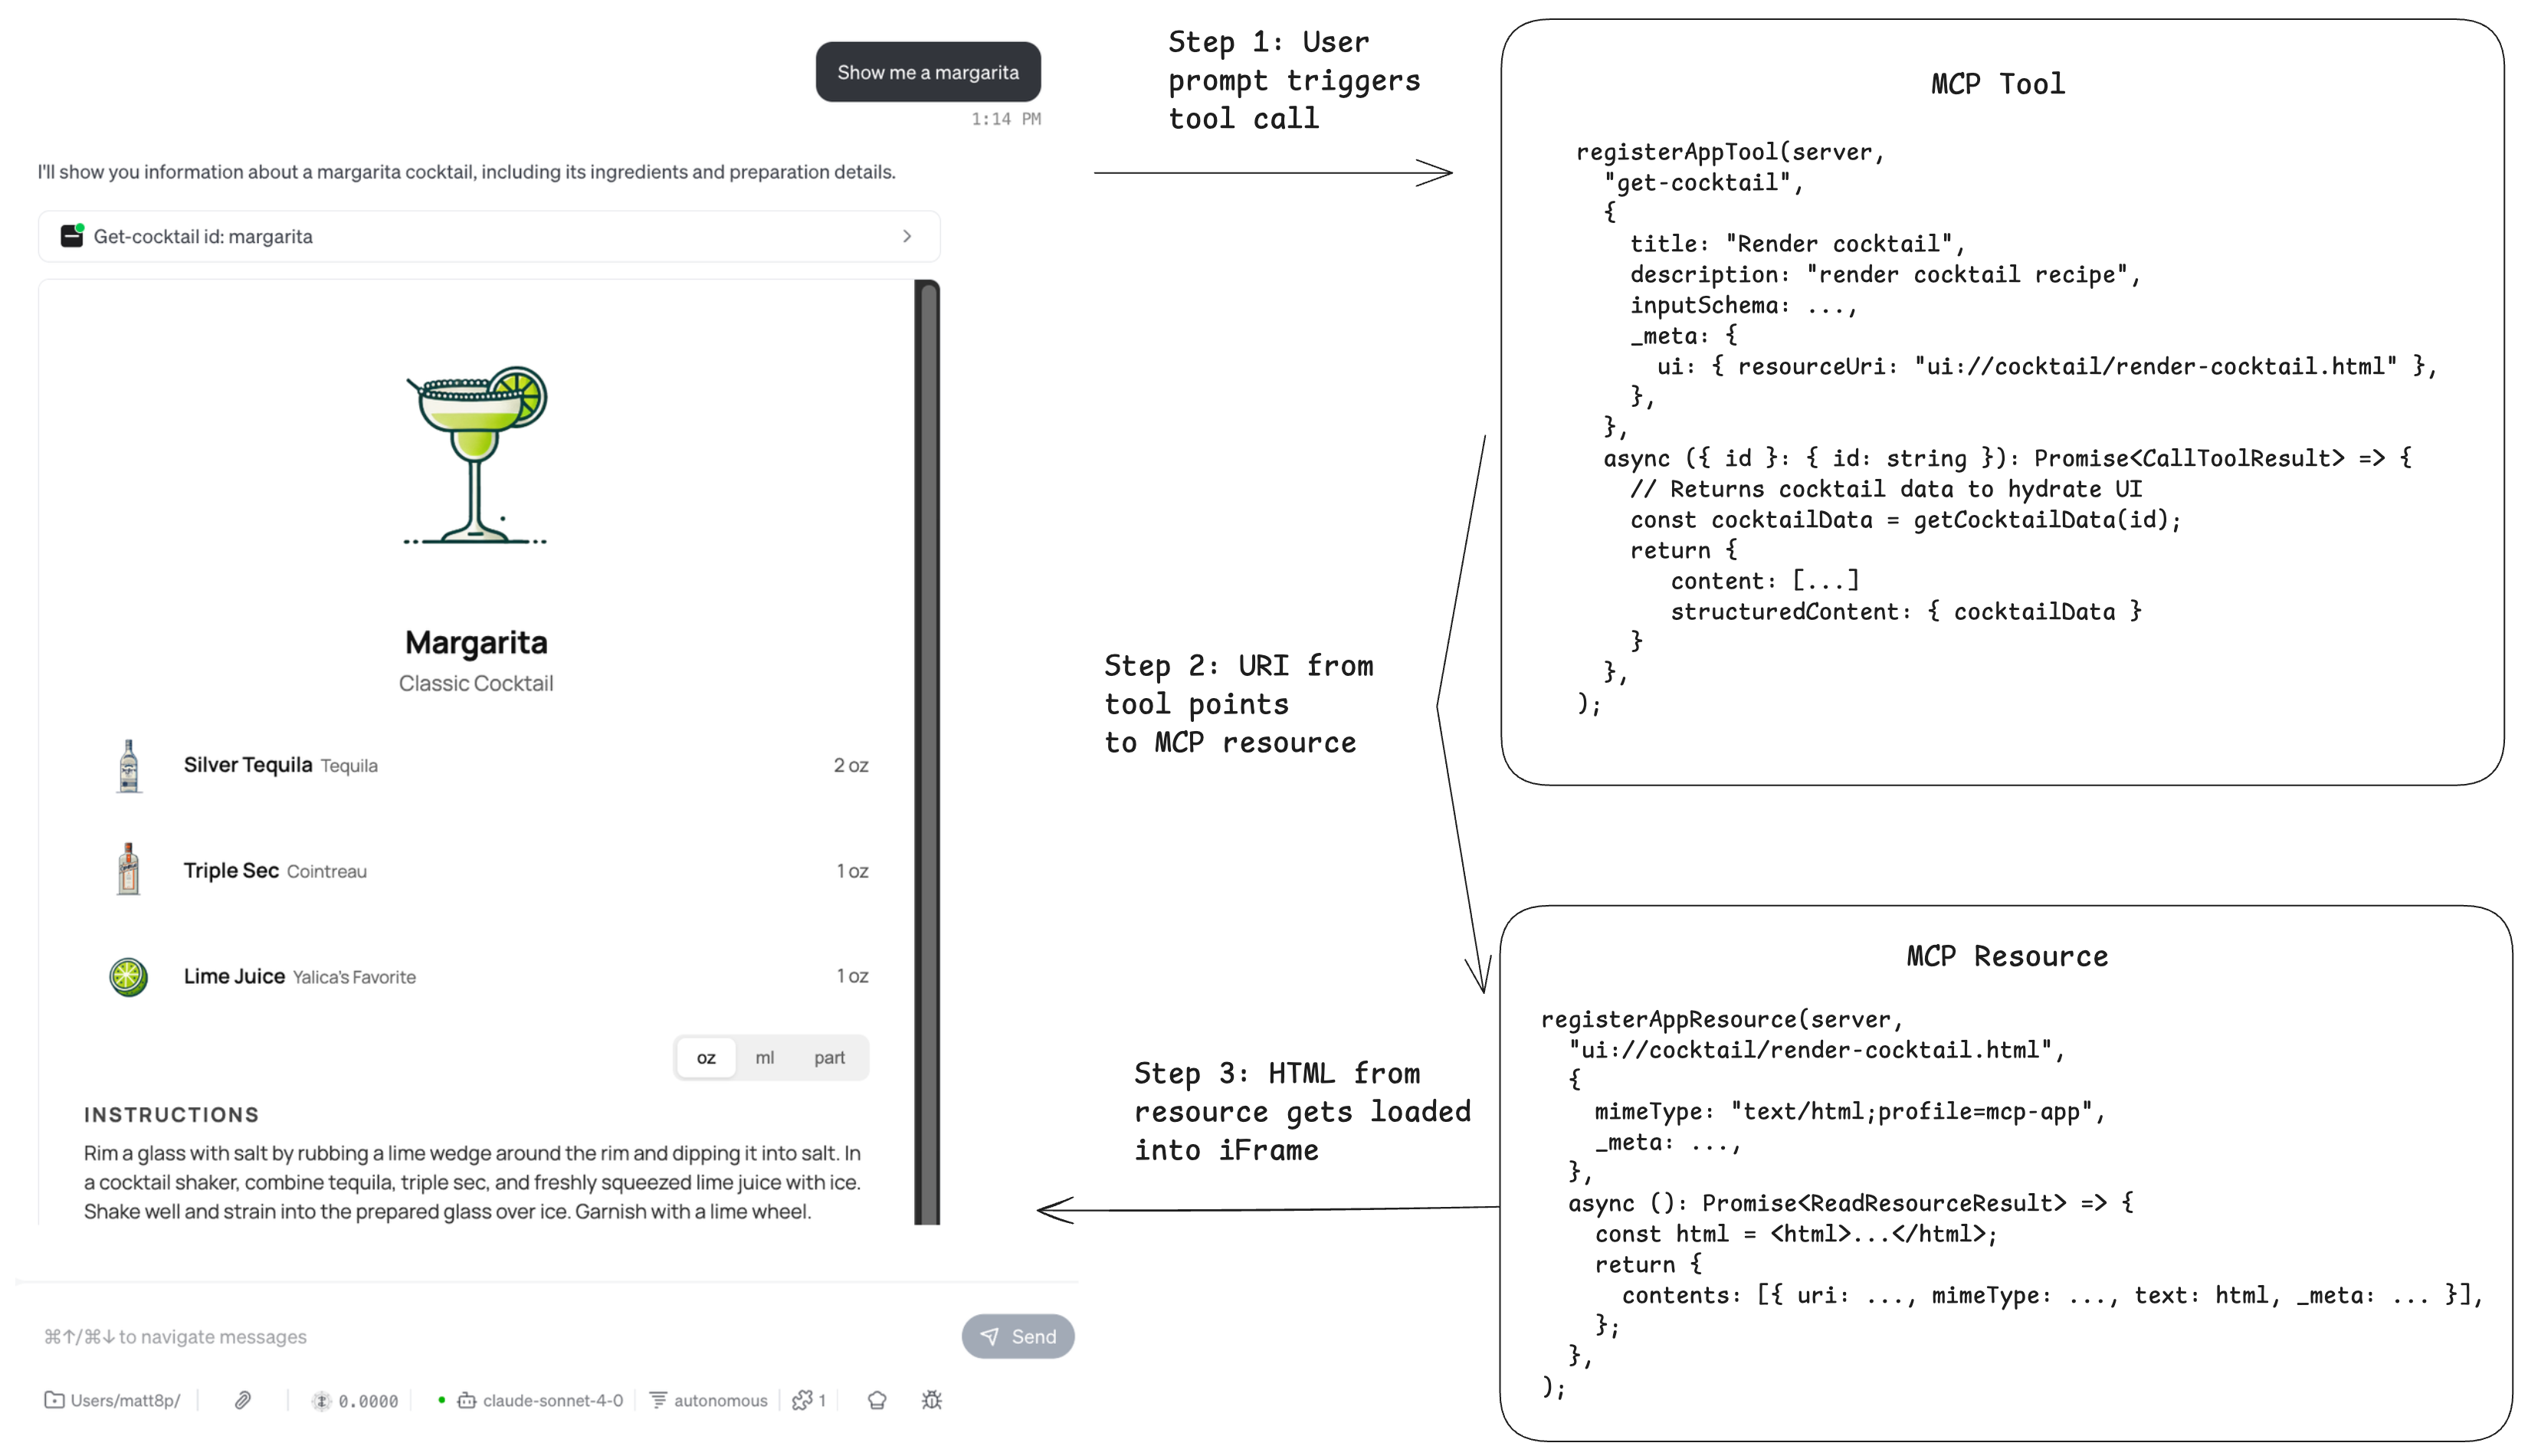
There's a lot that also goes on behind the scenes, such as View hydration, capability negotiation, and CSPs, but this is how it works at a high level. If you're interested in the full implementation of MCP Apps, we highly recommend giving the spec a read.
Tip 1: Adapt to the Host Environment
When building an MCP App, you want it to feel like a natural part of the agent experience rather than something bolted on. Visual mismatches are one of the fastest ways to break that illusion.
Imagine a user starting an MCP App interaction inside a dark-mode agent, but the app renders in light mode and creates a harsh visual contrast. Even if the app works correctly, the experience immediately feels off.
By default, your MCP App has no awareness of the surrounding agent environment because it runs inside a sandboxed iframe. It cannot tell whether the agent is in light or dark mode, how large the viewport is, or which locale the user prefers.
The agent, referred to as the Host, solves this by sharing its environment details with your MCP App, known as the View. When the View connects, it sends a ui/initialize request. The Host responds with a hostContext object describing the current environment. When something changes, such as theme, viewport, or locale, the Host sends a ui/notifications/host-context-changed notification containing only the updated fields.
Imagine this dialogue between the View and Host:
View: "I'm initializing. What does your environment look like?"
Host: "We're in dark mode, viewport is 400×300, locale is en-US, and we're on desktop."
User switches to light theme
Host: "Update: we're now in light mode."
It is your job as the developer to ensure your MCP App makes use of the hostContext so it can adapt to the environment.
How to use hostContext in your MCP App
import { useState } from "react";
import { useApp } from "@modelcontextprotocol/ext-apps/react";
import type { McpUiHostContext } from "@modelcontextprotocol/ext-apps";

function MyApp() {
  const [hostContext, setHostContext] = useState<McpUiHostContext | undefined>(undefined);

  const { app, isConnected, error } = useApp({
    appInfo: { name: "MyApp", version: "1.0.0" },
    capabilities: {},
    onAppCreated: (app) => {
      app.onhostcontextchanged = (ctx) => {
        setHostContext((prev) => ({ ...prev, ...ctx }));
      };
    },
  });

  if (error) return <div>Error: {error.message}</div>;
  if (!isConnected) return <div>Connecting...</div>;

  return (
    <div>
      <p>Theme: {hostContext?.theme}</p>
      <p>Locale: {hostContext?.locale}</p>
      <p>Viewport: {hostContext?.containerDimensions?.width} x {hostContext?.containerDimensions?.height}</p>
      <p>Platform: {hostContext?.platform}</p>
    </div>
  );
}
If you're using the useApp hook in your MCP App, the hook provides a onhostcontextchanged listener. You can then use a React useState to update your app context. The host will provide their context, it's up to you as the app developer to decide what you want to do with that. For example, you can use theme to render light mode vs dark mode, locale to show a different language, or containerDimensions to adjust the app's sizing.
Tip 2: Control What the Model Sees and What the View Sees
There are cases where you may want to have granular control over what data the LLM has access to, and what data the view can show. The MCP Apps spec specifies three different tool return values that lets you control data flow, each are handled differently by the app host.
content: Content is the info that you want to expose to the model. Gives model context.structuredContent: This data is hidden from the model context. It is used to send data over the View for hydration._meta: This data is hidden from the model context. Used to provide additional info such as timestamps, version info.
Let's look at a practical example of how we can use these three tool return types effectively:
server.registerTool(
  "view-cocktail",
  {
    title: "Get Cocktail",
    description: "Fetch a cocktail by id with ingredients and images...",
    inputSchema: z.object({ id: z.string().describe("The id of the cocktail to fetch.") }),
    _meta: {
      ui: { resourceUri: "ui://cocktail/cocktail-recipe-widget.html" },
    },
  },
  async ({ id }: { id: string }): Promise<CallToolResult> => {
    const cocktail = await convexClient.query(api.cocktails.getCocktailById, {
      id,
    });

    return {
      content: [
        { type: "text", text: `Loaded cocktail "${cocktail.name}".` },
        { type: "text", text: `Cocktail ingredients: ${cocktail.ingredients}.` },
        { type: "text", text: `Cocktail instructions: ${cocktail.instructions}.` },
      ],
      structuredContent: { cocktail },
      _meta: { timestamp: new Date().toString() }
    };
  },
);
This tool renders a view showing a cocktail recipe. The cocktail data is being fetched from the backend database (Convex). The View needs the entire cocktail data so we pass the data to it via structuredContent. For the model context, the LLM doesn't need to know the entire cocktail data like the image URL. We can extract the information that the model should know about the cocktail, like the name, ingredients, and instructions. That information can be passed to the model via content.
It's important to note that currently, ChatGPT apps SDK handles it differently, where structuredContent is exposed to both the model and the View. Their model is the following:
content: Content is the info that you want to expose to the model. Gives model context.structuredContent: This data is exposed to the model and the View._meta: This data is hidden from the model context.
If you're building an app that supports both MCP Apps and ChatGPT apps SDK, this is an important distinction. You may want to conditionally return values, or conditionally render tools based off of whether the client is MCP App support or ChatGPT app.
Tip 3: Properly Handle Loading States and Error States
It's pretty typical for the iFrame to render first before the tool finishes executing and the View gets hydrated. You're going to want to let your user know that the app is loading by presenting a beautiful loading state.
One powerful feature to note: toolInputs are sent and streamed into the View even before the tool execution is done. This allows you to create cool partial loading states where you can show the user what's being requested while the data is still being fetched.
To implement this, let's take a look at the same cocktail recipes app. The MCP tool fetches the cocktail data and passes it to the View via structuredContent. We don't know how long it takes to fetch that cocktail data, could be anywhere from a few ms to a few seconds on a bad day.
server.registerTool(
  "view-cocktail",
  {
    title: "Get Cocktail",
    description: "Fetch a cocktail by id with ingredients and images...",
    inputSchema: z.object({ id: z.string().describe("The id of the cocktail to fetch.") }),
    _meta: {
      ui: {
        resourceUri: "ui://cocktail/cocktail-recipe-widget.html",
        visibility: ["model", "app"],
      },
    },
  },
  async ({ id }: { id: string }): Promise<CallToolResult> => {
    const cocktail = await convexClient.query(api.cocktails.getCocktailById, {
      id,
    });

    return {
      content: [
        { type: "text", text: `Loaded cocktail "${cocktail.name}".` },
      ],
      structuredContent: { cocktail },
    };
  },
);
On the View side (React), the useApp AppBridge hook has a app.ontoolresult listener that listens for the tool return results and hydrates your View. While onToolResult hasn't come in yet and the data is empty, we can render a beautiful loading state.
import { useApp } from "@modelcontextprotocol/ext-apps/react";

function CocktailApp() {
  const [cocktail, setCocktail] = useState<CocktailData | null>(null);

  useApp({
    appInfo: IMPLEMENTATION,
    capabilities: {},
    onAppCreated: (app) => {
      app.ontoolresult = async (result) => {
        const data = extractCocktail(result);
        setCocktail(data);
      };
    },
  });

  return cocktail ? <CocktailView cocktail={cocktail} /> : <CocktailViewLoading />;
}
Handling errors
We also want to handle errors gracefully. In the case where there's an error in your tool, such as the cocktail data failing to load, both the LLM and the view should be notified of the error.
In your MCP tool, you should return an error in the tool result. This is exposed to the model and also passed to the view.
server.registerTool(
  "view-cocktail",
  {
    title: "Get Cocktail",
    description: "Fetch a cocktail by id with ingredients and images...",
    inputSchema: z.object({ id: z.string().describe("The id of the cocktail to fetch.") }),
    _meta: {
      ui: { resourceUri: "ui://cocktail/cocktail-recipe-widget.html" },
      visibility: ["model", "app"],
    },
  },
  async ({ id }: { id: string }): Promise<CallToolResult> => {
    try {
      const cocktail = await convexClient.query(api.cocktails.getCocktailById, {
        id,
      });

      return {
        content: [
          { type: "text", text: `Loaded cocktail "${cocktail.name}".` },
        ],
        structuredContent: { cocktail },
      };
    } catch (error) {
      return {
        content: [
          { type: "text", text: `Could not load cocktail` },
        ],
        error
      };
    }
  },
);
Then in useApp on the React client side, you can detect whether or not there was an error by looking at the existence of error from the tool result.
Tip 4: Keep the Model in the Loop
Because your MCP App operates in a sandboxed iframe, the model powering your agent can't see what happens inside the app by default. It won't know if a user fills out a form, clicks a button, or completes a purchase.
Without a feedback loop, the model loses context. If a user buys a pair of shoes and then asks, "When will they arrive?", the model won't even realize a transaction occurred.
To solve this, the SDK provides two methods to keep the model synchronized with the user's journey: sendMessage and updateModelContext.
sendMessage()
Use this for active triggers. It sends a message to the model as if the user typed it, prompting an immediate response. This is ideal for confirming a "Buy" click or suggesting related items right after an action.
// User clicks "Buy" - the model responds immediately
await app.sendMessage({
  role: "user",
  content: [{ type: "text", text: "I just purchased Nike Air Max for $129" }],
});
// Result: Model responds: "Great choice! Want me to track your order?"
updateModelContext()
Use this for background awareness. It quietly saves information for the model to use later without interrupting the flow. This is perfect for tracking browsing history or cart updates without triggering a chat response every time.
// User is browsing - no immediate response needed
await app.updateModelContext({
  content: [{ type: "text", text: "User is viewing: Nike Air Max, Size 10, $129" }],
});
// Result: No response. But if the user later asks, "What was I looking at?", the model knows.
Tip 5: Control Who Can Trigger Tools
With a standard MCP server, the model sees your tools, interprets the user's prompt, and calls the right tool. If a user says "delete that email," the model decides what that means and invokes the delete tool.
However, with an MCP App, tools can be triggered in two ways: the model interpreting the user's prompt, or the user interacting directly with the UI.
By default, both can call any tool. For example, say you build an MCP App that visually surfaces an email inbox and lets users interact with emails. Now there are two potential triggers for your tools: the model acting on a prompt to delete an email, and the user clicking a delete button directly in the App's interface.
The model works by interpreting intent. If a user says "delete my old emails," the model has to decide what "old" means and which emails qualify. For some actions like deleting emails, that ambiguity can be risky.
When a user clicks a "Delete" button next to a specific message in your MCP App, there is no ambiguity. They have made an explicit choice.
To prevent the model from accidentally performing high-stakes actions based on a misunderstanding, you can use tool visibility to restrict certain tools to the MCP App's UI only. This allows the model to display the interface while requiring a human click to finalize the action.
You can define visibility using these three configurations:
["model", "app"](default) — Both the model and the UI can call it["model"]— Only the model can call it; the UI cannot["app"]— Only the UI can call it; hidden from the model
Here's how you might implement this:
// Model calls this to display the inbox
registerAppTool(server, "show-inbox", {
  description: "Display the user's inbox",
  _meta: {
    ui: {
      resourceUri: "ui://email/inbox.html",
      visibility: ["model"],
    },
  },
}, async () => {
  const emails = await getEmails();
  return { content: [{ type: "text", text: JSON.stringify(emails) }] };
});

// User clicks delete button in the UI
registerAppTool(server, "delete-email", {
  description: "Delete an email",
  inputSchema: { emailId: z.string() },
  _meta: {
    ui: {
      resourceUri: "ui://email/inbox.html",
      visibility: ["app"],
    },
  },
}, async ({ emailId }) => {
  await deleteEmail(emailId);
  return { content: [{ type: "text", text: "Email deleted" }] };
});
Start Building with goose and MCPJam
MCP Apps open up a new dimension for agent interactions. Now it's time to build your own.
- Test with MCPJam — the open source local inspector for MCP Apps, ChatGPT apps SDK, and MCP servers. Perfect for debugging and iterating on your app before shipping.
- Run in goose — an open source AI agent that renders MCP Apps directly in the chat interface. See your app come to life in a real agent environment.
Ready to dive deeper? Check out the MCP Apps tutorial or build your first MCP App with MCPJam.